Monday, October 31, 2011

2011 Halloween Truss Paddle

Every year on Halloween, Hood River-ites get together for a costume paddle down the "Green Truss" section of the White Salmon River. This year Jesse and I weren't sure if we were going to make it as we decided to try our hand at racing bikes in the Day of the Dead Super D in Bend, OR the day prior. Turns out it is pretty fun, and worked out pretty well as I placed 1st in the Women's Under 34 category, while my friend and fellow paddler, Rachel Crowder rode smooth to a nice 5th place finish. Wohoo!

After a rainy drive home at midnight, we went to sleep dreaming of what to wear to the Halloween paddle the next day. To be a clown or wonderwoman? Hmmm...... Feeling slightly exhausted in the morning, we showed up fashionably late by 1 hour. Oops. Apparently we were meeting at 11, not 12...


Fashionably Late: Jesse and myself

This year's Halloween crew- Zombies, Superheroes, Pumpkins, Fairies, Clowns...

Captain America and Mr. T


Headless Horseman from Sleepy Hollow!

The Headless Horseman dropping Big Brother while Mrs. Jetson plays safety


Some Fun Video from the Day by Vampire, Drew Eastman:


Happy Halloween!

Kim Russell

Gear Review: Five Ten Water Tennie


As a whitewater kayaker, it is not uncommon to be found walking along a slick rock river bank, or climbing down a steep embankment to the river -- all the while carrying a 60 lb kayak on your shoulder. One wrong move and it is all too easy to slip into the river, or take a fall. Therefore, when it comes to kayaking, I am picky about my paddling shoes and the rubber I choose to wear on my feet.


Normally, when I get a new pair of paddling shoes, I find myself timidly walking down to the riverbank waiting to fall; something I consider the "New Shoe Ritual", where I quickly find the limits of my new rubber. Not this time, however. The Water Tennie stuck to every surface I had the guts to walk on. High angle, low angle, wet, dry, mossy -- The Water Tennie is my new favorite paddling shoe.


The Fit:


The Water Tennie fits like a glove. Not only are they 'uber' comfortable, they offer excellent arch support and protection from the elements with their protective rubber toe cap, and barrel trim. The synthetic upper mesh allows the shoe to dry quickly, and breathe, while drainage holes allow the shoe to shed water fast. The quick lace system, inner gaiter, and general design of the shoe allows the shoe to grip your foot and keep dirt out. WIN!


The Rubber:


The Water Tennie features Five Ten's Stealth Phantom Rubber, a non-marking rubber known for its high friction and durability. In addition, Five Ten has added a sharp "edge" around the shoe, allowing you to take full advantage of the shoe, and use all those little rock ridges in the rock for added traction.


Whether walking across slick rock, or clambering down a sketchy put-in, my shoes were rock solid, and kept me on my feet rather than my bum.


Overall Review:


All in all, the Water Tennie is a great paddling shoe. They have excellent wet and dry traction, are very comfortable, and offer protection in all the right places. I am excited to call these my new creeking shoes!


For more information, or to order online: http://fiveten.com/products/footwear-detail/10103-water-tennie


Kim Russell

Team FiveTen


Rogue River Trip


Every year when the seasons change, and Fall rolls around, I start thinking about a paddling vacation. Some years it's BC, others it's California....


This year was Oregon. Plan A was Canada, eh, while Plan B was the 11 friends, 2 rafts and a pirate party on the Rogue River. Plan A fell through a week before D-day, and Plan B sounded like a pretty rad option, so we said yes, and had ourselves a little 3-day, 2-night vacation on the Wild and Scenic Rogue River from Graves Creek to Foster Bar.


This section of the Rogue River is known for it's history (mining and homsteading), black bears, and mountainous terrain. Not to mention beautiful scenery and quality rapids such as Rainie Falls and Blossom Bar.


Our group exploring Zane Grey's Cabin

Zane Grey's Cabin

With a forecast for three very rainy days, eleven of us, including trip leader, Kate Wagner, and Birthday-Girl, Rachel Crowder launched Sunday morning from Graves Creek, making camp at Battle Bar, 16 miles downstream.

The crew below the put-in: Kevin, Kate, and I

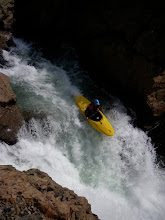
Scouting Rainie Falls, 'proper'

Joe Stumpfel in his Wave Hopper, and the rest of the crew

Kelsey Lake

Keeping with Southern Oregon tradition, we brought pumpkins with us on the river.

and placed them in obscure spots along the river... such as this one.

Battle Bar

Shelter for the night


Day 2: After a very rainy night, we woke up and had a pancake and sausage feast - Breakfast of Champions! After a quick stop at Zane Grey's Cabin, we were off to paddle 12 miles from Battle Bar through Mule Creek Canyon, and bigger rapids such as Coffeepot, and Blossom Bar to Lower Solitude, our camp for day 2.


Kevin, Joe Stumpfel, Bryon Dorr, and Shalynn


Mule Creek Canyon

Waterfall in Mule Creek Canyon

Blossom Bar

Myself at Blossom Bar

Party on the River!

Lower Solitude Camp - Bocce Ball and Pirate Party

Day 3: Our last day on the river, we had about 7 miles till the takeout at Foster Bar. It was decided to take our time getting to the takeout, and make a pit stop here and there along the way to check out nearby waterfalls and water slides.

Flora Dell Falls


At 1:30pm, we rolled into Foster Bar, our take-out. What a great 3 days on the river! Between rain showers, we broke down the rafts, and made quick work of the drive home to Hood River.


Happy early-Halloween!


Kim Russell


How To: The Cartwheel

I'm not going to lie...cartwheeling is hard. It's one of those moves that is hard to teach, hard to learn, and requires a lot of technique. It's one of those moves that you have to try and try and try until you get the "Feel" of throwing an end or two. Some people learn in flatwater first, where as others do better starting out in a hole. I, myself, learned in flatwater and it took me a little while before I could even double pump (initiate the bow and stern in flatwater). In other words, don't be discouraged. Some people get it quickly and for others it takes more time. In the process, you'll learn all about edge control, leading with head, and incorporating your core muscles into the move. Overall, you'll be a better paddler.


Here's a quick little video that breaks down how to cartwheel in a hole. Let me just say the new Project X is pretty good at cartwheeling...

In my next how-to post, I will go over a few flatwater drills that help improve edge control and get you cartwheeling!


Cheers,


Kim Russell

Washington's Gem: The Cispus River

Mt. Adams, the headwaters of the Cispus River

After nearly 11 weeks of no creeking this summer, my shoulder has finally started feeling good. Good enough to get in my Diesel 80 and "off the couch" it on the Upper Upper Cispus, a class V gem of a creek located outside Randle, WA. With rumors of a run clear of wood, our group of five was stoked!

The Upper Upper Cispus is pretty fun. It's a committing run with several large drops, and a mandatory 30 footer near the end of the run called Behemoth. With its breathtaking scenery and classic rapids, it's got something for everyone to enjoy!


The run starts out with a "Good Morning!" boof off a 15 footer followed by a quick log-duck. (For the record, I think yesterday it was actually, Good Morning, Nasal-Douche! Yup, my sinuses thank me for that one today.) What follows are miles and miles of boulder gardens and various class IV-V ledge drops.


Typical Cispus rapids and scenery (Photo from Johnathan Blum on another run)


At the first major rapid, Island drop, the river splits around an island. The left side of the drop is 10 foot slide/falls that feeds straight into the meat of a gnarly hole. Not the desired way to get stuck in a hole. We opted for the right side, a two-tiered rapid: a pinch dropping 8 feet or so, followed in 30 feet by a meaty hole. Good lines!


Joe (L) and Trevor (R) Looking back up at Island Drop


Below Island, the river begins to drop quickly, as is drops into a basalt gorge leading to the small pool at the lip of Behemoth Falls.

The gorge above Behemoth

Scouting the gorge and getting ready for Behemoth- Trevor Sheenan, Jesse Becker and Joe Stumpfel


Behemoth is a mandatory 30 foot falls, that has a 15 foot ramp leading into a 15 foot falls that twists to the right. The line is down the center left side of the green tongue, and off center right of the flume. Sweet! Once you hit the pool, charge the hole below. After a quick scout at the lip, we fired it off, one by one, each having a sweet line off the falls. Wohoo!

Myself on Behemoth

Behemoth Falls, and the hole below


Below Behemoth are two large boulder gardens that you can't help but giggle through after stomping Behemoth.


What a great way to get back on the rio!


Kim Russell


The Top 5 Things I wish I knew as a Beginner Paddler...


Photo Copyright Robin Carleton of Off Route Photography

I first started kayaking in 2001 when I was 12 years old. I was a wee little one and unfortunately there was (and still isn't) a manual to whitewater kayaking. In that first year, I learned to roll, learned to surf a wave, learned to pick my line through a rapid, and even learned to hand roll. This was great and all, but there were a few things I wish someone would have told me about in the beginning...

Kim's Top Five Tips for Beginners


Cheers,

Kim Russell

How To: Recover from a Rotator Cuff Injury

For the last 7 weeks, I have been working to rehabilitate a bum shoulder, the result of going over the bars on a waterfall. The Verdict: Rotator Cuff Strain/Tear or Torn Labrum. I've got two more weeks before I get an MRI, and know for sure what is wrong. Hoping to heal up and feel better before then. Currently, I'm on a conservative rehabilitation program, am on the mend, and working hard to follow a solid strengthening program balanced with plenty of rest. This has meant no whitewater for the last 7 weeks!! Instead, I have been paddling lots of flat water, biking as much as I can, and working hard in my therapy.

-----------------------------------------------------------------------------------------------------------------

A Rotator Cuff injury can happen at any time. You may have had an incident on the river that you can point to as the culprit: High bracing your way through a rapid, or like me, you may simply have woken up with a deep ache one morning.

The Rotator Cuff is comprised of four muscles that surround the Glenohumoral Joint, and provide support to the shoulder girdle.

If one or more muscles is compromised, so is stability at the joint. This means easier shoulder dislocations and other injuries. This also means that as paddlers we need to listen to our bodies and be particularly aware of the condition of our shoulders. We all need rest days here and there, especially after a long day on the river or a particularly difficult section of river. These rest days are very important in order to let our muscles recover from the stress and strain we put on them when paddling.

Below is a rehabilitation program for those of you who have suffered a rotator cuff injury, think you may have, or are simply looking for more shoulder strengthening/stabilizing exercises. For two of these exercises, therabands will be used, rather than free weights. Therabands do not depend on gravity to provide resistance, allowing for resistance in all planes, including the horizontal plane. In addition, therabands allow for strengthening in more functional movement patterns that mimic everyday activities and sports.

Start with a low resistance theraband. Internal and External Rotator Muscles tend to be neglected and a lot weaker than you think. Once you can do 3 sets of 15 easily, move up in resistance.

Tie a knot in the end of a theraband, and close one end in a door at about elbow height. Hold your arm as pictured in the above diagrams, with your forearm at a 90 degree angle to your upper arm.

Shoulder External Rotation: Place a thin pillow between your elbow and torso, acting as a bolster. Stand with the door to your right, and place the theraband in your left hand. Keeping your elbow in close to your torso, pivot at the elbow, and move your hand outward from your body. Return to the original position, slowly, and continue for three sets of ten.

Shoulder Internal Rotation: Place a thin pillow between your elbow and torso, and stand with the door to your right. Place the theraband in your right hand. Keeping your elbow in close to your torso, pivot at the elbow, and move your hand toward your stomach. Return to the original position, slowly, and continue for three sets of ten.


Push up Plus: The push up plus functions to strengthen the Serratus Anterior, a muscle that serves to pull the scapula in toward the thorax. It helps stabilize the scapula, and by default, the Glenohumeral Joint.

Start in a standard push up plank position, with a straight torso and flat back. Keeping your arms straight, push up away from the ground, and round your back slightly at the shoulder blades. The movement is very discreet. Three sets of 15 and you will feel it between your shoulder blades, no matter how in shape you are. If it is too much to start on the ground, you can modify the exercise, and do this against the wall or using the edge of a table.

Lat Rows: Close a theraband in a door just below chest level. Hold an end in each hand, start with tension on the band, and pull back on the theraband by squeezing your shoulder blades together. Over emphasize this moment, keeping your elbows close into your torso. Slowly return to the original position, and continue for 3 sets of 10.

-----------------------------------------------------------------------------------------------------------------------------------------

These four exercises are a start to a rehabilitation program for the injured rotator cuff. You may need to lay off paddling whitewater for a few weeks, if needed, and focus on basic strengthening. The rule of thumb is to stop if you have any pain, and to balance rehab with rest. Try stretching, massage, acupuncture, and physical therapy, if needed. Last of all, don't lose hope! Our bodies DO heal, they just need time and lots of rest!

Here's to week 7 of Physical Therapy!

Kim Russell

**Kim Russell has a B.S. in Human Physiology from the University of Oregon. She is currently working as a Physical Therapist Aide, earning glances into stretches, strengthening exercises and mobilization techniques for paddlers. These techniques are ones that she has found to work for herself in strengthening her shoulder muscles, and may not be suitable for some individuals. Consult your physician before trying any of these exercises.**